Monday, October 29, 2012

Cilanto Lime Pesto Chicken Tacos


via
This recipe is from Joelen over at What's Cooking Chicago 

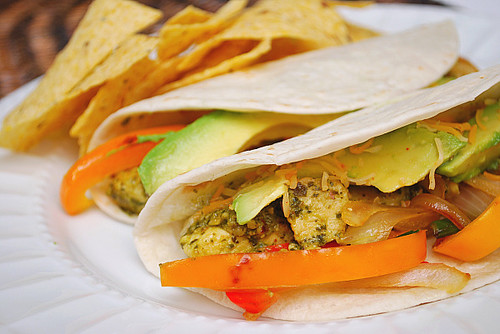
Cilantro Lime Chicken Tacos - Makes enough for 4 tacos
Cooking spray for sauteing
2-3 boneless, skinless chicken breasts, cut into bite-sized pieces (I used 3)
salt and pepper to taste
1 tsp garlic powder
1/2 cup cilantro lime pesto (recipe follows)
flour or corn tortilla
preferred taco garnishes (salsa, sour cream, cheese, etc)

1) Season chicken with salt, pepper and garlic powder. (I read ahead on the recipe and noticed the 1 1/2 tsp of Kosher Salt in the pesto, so I did not season the chicken with any extra salt. The extra salt was not missed.)
2) In a skillet sprayed with cooking spray, saute chicken over medium high heat and cooked through. 
3) Toss the cooked, seasoned chicken with the pesto. Fill tortillas with chicken and top with preferred garnishes. (I served mine with cheese, tomatoes and hot sauce. My hubby commented that sour cream and a diced onion would have added as well. I agree.)

*To make ahead/freezer meal - Cook chicken as directed above and cool. Place chicken in freezer bag. Prepare Cilantro Lime Pesto as directed below. Place 1/2 cup of pesto in a small storage bag then place inside the freezer bag with the chicken. Freeze. When ready to prepare, defrost and heat chicken. Toss chicken with defrosted pesto. If desired, heat chicken and pesto together before filling tacos.

Cilantro Lime Pesto - Makes 1 cup
1 cup fresh cilantro leaves (do not include stems)
2 1/2 Tbsps extra virgin olive oil
2 Tbsps sliced, toasted almonds
3 Tbsps fresh, chopped garlic
1 1/2 tsps lime juice
1/2 cup shredded Asiago (Parmesan or Romano can be substitued too) (I didn't have any of these cheeses on hand. So, I used some leftover Wild Garlic Havarti. It was very, very good.)
1 1/2 tsps Kosher Salt
1/4 cup chicken broth
1) Using a blender, mix together the cilantro, olive oil, almonds, garlic, lime juice, cheese, salt and chicken broth on low speed for 2 minutes.

Nutritional Information:
4 servings
Amount per serving:
Calories:          416          
Fat:                    17g  
Carbs:             16.6g      
Fiber                 2.7g        
Protein:           46.2g 
Weight Watchers Points Plus Value: 10 

Thoughts: I LOVE THIS RECIPE!!! This was really flavorful. My Hubby and I both loved it. I have been looking for great and easy recipes to serve over the holidays when I have a houseful of people, and this just made it onto the list. For these reasons, I give this recipe 5 easy pins!


If you just hopped over here from Pinterest, Welcome! Feel free to check out any of the other recipes I have reviewed. And come back for another visit sometime soon. - Lynn

Want to learn more about tacos or limes? See the ads below!

Monday, June 11, 2012

Cheap Korean Beef

This recipe is from Lizzy over at Lizzy WritesFollow the recipe here (with my additions and improvements in red).
Cheap Korean Beef - Serves 6
1 lb lean ground beef
1/4 - 1/2 cup brown sugar (I like it sweet so I usually do closer to 1/2) (Lynn here - I like things less sweet, so I went with 1/4 cup and it was just perfect!)
1/4 cup soy sauce (I use low-sodium)
1 Tbsp sesame oil
3 cloves garlic, minced
1/2 tsp fresh ginger, minced
1/2 - 1 tsp crushed red peppers (I hate to chew on a red pepper flakes. So I went with 1/4 tsp cayenne pepper. Spicy throughout, yet no big pepper chunks lurking about. If your family is not spice-friendly, don't use any or taste as you go.)
salt and pepper
1 bunch green onions, diced 
1) Heat a large skillet over medium heat and brown hamburger with garlic in the sesame oil.
2) Drain most of the fat and add brown sugar, soy sauce, ginger, salt and pepper and red peppers. 
3) Simmer for a few minutes to blend the flavors. Serve over steamed rice and top with green onions.
Nutritional Information:
6 servings
Amount per serving:
Calories:          265          
Fat:                    18g  
Carbs:             14.2g      
Fiber                   .2g        
Protein:           14.2g 
Weight Watchers Points Plus Value: 7.5
Thoughts: I LOVE THIS RECIPE!!! This was quick and really flavorful. I don't usually gravitate towards quick and easy, but this really was quick, easy and super yummy. Everyone at the table loved it and wanted it added to our home cooking menu choices. For these reasons, I give this recipe 5 easy pins!
If you just hopped over here from Pinterest, Welcome! Feel free to check out any of the other recipes I have reviewed. And come back for another visit sometime soon. - Lynn
Want to learn Korean? See the ad below!

Monday, May 14, 2012

Cannellini & Ham Soup

White Bean and Ham Soup
via
This recipe is from Christine over at Chow. Follow the recipe here (with my additions and improvements in red).
Cannellini & Ham Soup  Serves 8
Ingredients:
1lb dried cannellini beans
3 1/2 quarts (14 cups) water, plus more for soaking the beans
1 meaty smoked ham bone or 2 ham hocks (about 1 pound)
3 fresh thyme springs or 1/2 tsp dried thyme (I used 1 tbsp dried and it could probably have used a little more than that).
2 medium carrots
2 medium celery stalks
1 medium yellow onion, chopped
1 tsp kosher salt, plus more as needed
1 1/2 cups medium-dice, fully cooked smoked ham (about 8 ozs)
Freshly ground black pepper
Instructions:
1) Place the beans in a large bowl and pick through them, removing and discarding any broken beans or stones. Cover them with at least 3 inches of cold water. Allow to soak uncovered and at room temperature at least 8 hours or overnight. Drain in a colander and set aside.
2) Place the measured water and ham bone or hocks in a Dutch oven or large, heavy-bottomed pot and bring to a boil over medium-high heat. Reduce the heat to medium and simmer uncovered for 1 hour. (I skipped cooking the water and the bone and hock by themselves. I moved on to step number 3 and cooked the bone and hock with the beans.)
3) Add the soaked beans and thyme, stir to combine (leave the bone and hocks in the pot), and return to a simmer, skimming the surface with a spoon as necessary to remove any scum. Cook, stirring occasionally, until the beans are almost completely tender but still a little underdone in the center, about 1 hour (the beans should not be completely cooked because they will cook more later).
4) Meanwhile, peel and cut the carrots into medium dice and place in a medium bowl. Cut the celery and onion into medium dice and add them to the bowl with the carrots. Add the diced vegetables and measured salt to the pot, stir to combine, and bring to a simmer. Cook, stirring occasionally, until the beans and vegetables are tender and the meat is falling off the bone, about 40 minutes more. Turn off the heat.
5) Remove the ham bone or hocks to a cutting board and let sit until cool enough to handle. Remove the meat from the bones and set it aside (discard the skin and bones).
6) Using a potato masher, lightly mash half of the beans and vegetables, leaving the remaining half intact. Stir in the diced and reserved ham. Taste and season with salt and pepper as needed.
Nutritional Information:
8 servings
Amount per serving:
Calories:          127          
Fat:                   2.9g  
Carbs:             16.5g      
Fiber                 3.5g        
Protein:             8.9g 
Weight Watchers Points Plus Value: 3
Thoughts: This was good, but it could have been better. Next time I will increase the amount of thyme and add garlic to the recipe. I made this recipe and Creamy Potato & Ham Soup during the same week. My hubby much preferred the Creamy Potato & Ham Soup. So for those reasons, I give this recipe 3 pins.
If you just hopped over here from Pinterest, Welcome! Feel free to check out any of the other recipes I have reviewed. And come back for another visit sometime soon. - Lynn
Who knew the lowly potato saved the world? See the ad below!

Wednesday, May 9, 2012

Creamy Ham and Potato Soup


via
This recipe is from Christy over at The Girl Who Ate Everything. Follow the recipe here (with my additions and improvements in red).
Creamy Ham and Potato Soup - Serves 6
3 1/2 cups peeled and diced potatoes
1/3 cup diced celery
1/3 cup finely chopped onion
1/2 cup carrot, diced (optional)
1 cup diced cooked ham (I ended up adding 2 cups. One cup seemed a little on the skimpy side.)
3 1/4 cups chicken broth
1/2 tsp salt, or to taste
1 tsp ground white or black pepper, or to taste
5 tbsps butter
5 tbsps all-purpose flour
2 cups milk
Note: I added some carrots that I had and Becky said she adds a can of corn too which would be good.
Note: I thought the soup a little under seasoned. So I added 2 cloves of garlic, minced and 2 tsps of dried basil. My hubby LOVED the soup with the basil.)
Directions:
1) Combine the potatoes, celery, onion, carrot, ham and chicken broth (and garlic) in a stockpot. Bring to a boil, then cook over medium heat until potatoes are tender, about 10 to 15 minutes. Stir in salt and pepper (and basil).
2) In a separate saucepan, melt butter over medium-low heat. Whisk in flour with a fork, and cook, stirring constantly until thick, about 1 minute. Slowly stir in milk so that lumps don't form and until all of the milk has been added. Continue stirring over medium-low heat until thick, 4 to 5 minutes.
3) Stir the milk mixture into the stockpot, and cook soup until heated through.
4) Top with cheddar cheese, chives, and bacon if desired. Serve immediately.
Nutritional Information:
6 servings
Amount per serving:
Calories:         268.7           
Fat:                     14g  
Carbs:              26.6g      
Fiber                  2.4g        
Protein:              9.9g 
Weight Watchers Points Plus Value: 7
Thoughts: This is a really good basic ham and potato soup recipe. I added in garlic and basil, and these made for a much more flavorful soup. But, oregano, thyme or even Italian seasoning could be experimented with as well. The only other thing I changed was to double the amount of ham. I just felt that one cup with that amount of liquid was a little on the sparse side. For all of these reasons, I give this soup recipe 4 hearty pins.
If you just hopped over here from Pinterest, Welcome! Feel free to check out any of the other recipes I have reviewed. And come back for another visit sometime soon. - Lynn
Who knew the lowly potato saved the world? See the ad below!

Monday, May 7, 2012

No Bake Energy Bites


via
This recipe is from Ali over at Gimme Some Oven. Follow her recipe here (with my additions and improvements in red):
No-Bake Energy Bites - Makes 20 - 25 (My batch made 20)
Ingredients:
1 cup (dry) oatmeal (I used old-fashioned oats)
1 cup toasted coconut flakes
1/2 cup chocolate chips
1/2 cup peanut butter (I tried almond butter)
1/2 cup ground flaxseed
1/3 cup honey
1 tsp vanilla
1) Stir all ingredients together in a medium bowl until thoroughly mixed. Let chill in the refrigerator for half an hour.
2) Once chilled, roll into balls of whatever size you would like. (Mine were about 1" in diameter.) Store in an airtight container (They are slightly sticky, so I stored them individually-wrapped and then put in an airtight container) and keep refrigerated for up to 1 week.
Ali's Tips: Substitution ideas can abound for just about any of these ingredients! Feel free to substitute in your favorite nut butter (almond (This is what I originally made them with - yummy!), sunflower seed, etc) for the peanut butter. And you could also add in some wheat germ in place of some or all of the flaxseed. I would caution, though, against substituting agave nectar for the honey, as the honey's thickness helps hold things together. Some other fun substitutions for the chocolate chips (or an addition to them) could include: chopped dried fruit, dried berries, chopped nuts, other chips.
Enjoy! (I agree!)
Nutritional Information:
20 Servings
Amount per serving:
Calories               157
Fat                     10.2g
Carbs                 14.9g
Fiber                    1.9g
Protein                3.5 g
Fiber                    1.9g
Protein:                3.5g
Weight Watchers Points Plus Values: 4
Thoughts: These should really be called, "Crack No Bake Energy Bites," or "Don't Plan on Eating Just One, Even Though You Know How Many Calories They Are, Because You Know You Are Going to Eat Them All, So Do It and Just Get It Over With." Yeah, they are that good! I will definitely make these again. The next time, however, I will hide them in the refrigerator of a friends house, in the next state over. Therefore, these delightful little bites get 5 healthy pins!
If you just hopped over here from Pinterest, Welcome! Feel free to check out any of the other recipes I have reviewed. And come back for another visit sometime soon. - Lynn
Who knew you could buy a Health Nut Care Package? See the ad below!

Wednesday, May 2, 2012

Guaranteed Crispy Sweet Potato Fries


via
This recipe is from Karen over at The Art of Doing Stuff. Follow her recipe here (with my improvements and additions in red):
Guaranteed Crispy Sweet Potato Fries - Serves 6
Ingredients:
sweet potatoes (Karen doesn't state how many/pounds to use, so I went with 3 medium potatoes, because that's how many she showed in the picture.)
1 or 2 tbsps corn starch
2 tbsps olive oil
1/2 cup mayonnaise
1 tsp Sriracha sauce
1/4 tsp Cayenne pepper
Directions:
1) Cut your sweet potatoes until they're medium thickness. Not hugely thick cut and not shoestring.
2) Let potatoes soak in water for an hour - half the day. (not mandatory, but recommended) (I would also add 1 tsp of salt. The water draws out the starch content of the potatoes, but the salt draws out the water content. This is important because you don't want your oven to become a steam bath.)
3) Preheat oven to 425 degrees.
4) Throw cornstarch into a plastic bag.
5) Dump a handful of sweet potatoes into the bag with the cornstarch. Twist the top of the bag so it forms a balloon with some air inside and shake the fries around until they're lightly coated with the cornstarch.
6) Put your coated fries on a non-stick cookie sheet.
7) Drizzle olive oil over the fries.
8) Using your hands, make sure the fries are well coated.
9) Arrange them on the sheet again, so they have space between each fry. The less fries on the pan, the better they'll cook. (I wish Karen could have been a little more exact in this instruction.) Too many shoved together and they'll never get crispy. They'll just steam. Pop the fries into your preheated oven and cook for 15 minutes.
10) Meanwhile you can make the dipping sauce. Mix together the mayonnaise with the Sriracha sauce and Cayenne pepper. You can adjust the proportions to taste. 
11) Check the fries after 15 minutes, flip them over (you might have to use a spatula depending on how "non-stick" your pan is) and return to the oven if necessary for another 5 minutes.
Nutritional Information:
6 servings
Amount per serving:
Calories:          212          
Fat:                17.9g  
Carbs:               12g
Fiber                1.9g          
Protein:            1.3g 
Weight Watchers Points Plus Value: 6
Thoughts: I'm afraid I can guarantee the guarantee in the title. They were not crispy, tasty, but not crispy. Karen ends this blog post by saying, "Please note: This recipe does have a bit of a learning curve. It may take a few attempts to get your proportions of corn starch and oil correct. It took me several years (seriously?) to figure out how to do this, but with these instructions it shouldn't take you more than a couple of tries - Karen." My feeling is that after years of trial and error, Karen could have come up with a more precise recipe. I was really looking forward to crispy fries, but it just did not happen. I will make this recipe again. And if I do achieve that perfect crisp to my fries, I will update you. For these reasons, this recipe gets 3 hearty pins.
If you just hopped over here from Pinterest, Welcome! Feel free to check out any of the other recipes I have reviewed. And come back for another visit sometime soon. - Lynn
Who knew you could buy instant mashed sweet potatoes? See the ad below!

Wednesday, April 25, 2012

Homemade Fortune Cookies

via
Hello! It's Lynn's daughter Kelly again. I'm here to guest blog about my most recent Pinterest recipe experience. Go check out more photos from my attempt at making these, or read about my upcoming summer in France on my blog, Rainboots & Beef.
This recipe is from Kelly (good name!) at Just a Taste. Here is her recipe (with my additions and improvements in red):
Homemade Fortune Cookies
Yield: 16 fortune cookies
Ingredients:
2 egg whites
½ teaspoon vanilla extract

¼ teaspoon cinnamon
½ cup all-purpose flour
½ cup sugar
Handwritten fortunes (optional)  I used quotes from my motivational quote board on Pinterest. (Lynn here - good choice Kelly!)
1 cup chocolate chips (optional) Ha. My cookies were so ugly I didn't feel like wasting chocolate on them.
Sprinkles, for garnish (optional) I ate the sprinkles out of the jar while I cooked, if that counts for anything.

Directions:
Preheat the oven to 350ºF. Line a sheet tray with parchment paper or a Silpat. (I didn't have either. Instead I just greased a regular cookie sheet.)
In a large bowl, whisk together the egg whites, vanilla, cinnamon, flour and sugar. The batter will be very loose. (The batter wasn't exactly lose. It was kind of like glue. I definitely approve of the cinnamon and vanilla in fortune cookies. It made them taste more like sugar cookies than fruit loops, which I think store-bought fortune cookies tend to taste like.)
Using a small spoon, scoop about 1 tablespoon of batter onto the lined cookie sheet. Use the back of the spoon to smooth the batter into a very thin circular layer. (This didn't exactly work for me because the cookie sheet was so greasy and slippery.) Repeat this process with additional batter to form two or three circles of batter on the cookie sheet. (I did three at a time. This is so you can insert fortune, fold, and pinch without the cookies beginning to harden, theoretically.)
Bake the cookies for 5 to 7 minutes, or just until the edges of the cookies begin to brown. (About six minutes seemed to work best for me, but if your cookies were as thin as they are supposed to be...this might be the burning point.)
Remove the cookies from the oven, place the handwritten fortunes in the centers of the cookies, and then use a flat spatula to very carefully release the cookie from the sheet tray. Fold it in half, then pinch the edges inward (as shown above) to create the fortune cookie shape. Continue this process with the remaining cookies, which will harden within 30 seconds of being formed. (This just didn't work. I placed the fortune on the cookie and spatula-ed the cookie off the cookie sheet, but when it came time to fold in half, they just broke, for the most part. The few that didn't break, were way too hot to pinch. About 2 cookies that I made even slightly resembled the shape of a fortune cookie, and none of them had even a slightly similar texture. They were basically folded sugar cookies with paper inside...and the paper was so enmeshed in the batter that you could hardly decipher what the fortune said.)
As an optional garnish, melt the chocolate chips in the microwave in 20-second intervals then dunk the hardened and cooled cookies into the chocolate. Immediately decorate the chocolate-dipped cookies with sprinkles and let harden. (Didn't do this. My cookies were too ugly.)

Nutritional Information:
16 servings
Amount per serving:
Calories:             41
Fat:                      .1g  
Carbs:                9.3g
Fiber                    .1g          
Protein:                 1g 
Weight Watchers Points Plus Value: 1

I probably wouldn't make these again unless I had a different recipe. I give this recipe 2 pins.
The result:
via
Thanks for letting me guest blog and I hope you stop by and check out my blog, Rainboots & Beef, sometime soon!
If you just hopped over here from Pinterest, Welcome! Feel free to check out any of the other recipes I have reviewed. And come back for another visit sometime soon. - Lynn

Monday, April 23, 2012

Teriyaki Chicken

This recipe is from Pam over at For the Love of CookingSee her recipe or follow the recipe here (with my additions and improvements in red):
Teriyaki Chicken - Serves 6
6 boneless skinless chicken thighs, trimmed of fat
1/4 cup soy sauce
2 tbsps brown sugar
2 tbsps chicken stock
2 tbsp rice vinegar
1/2 tsp sesame oil
2 garlic cloves, minced
1 tsp fresh ginger, finely grated
1/4 tsp red pepper flakes
2 tsp sesame seeds
1) Combine the soy sauce, sugar, chicken broth, vinegar, garlic, ginger, sesame oil and red pepper flakes (if you're not fond of chewing on a red pepper flake, go with 1/8 tsp of cayenne pepper or none at all) in a large zip lock bag. Mix until well combined. Add the trimmed chicken thighs to the marinade, seal the bag, and place in the refrigerator for up to 4 hours. (I went with one hour the first time I made this and the flavors came out great. Second time I marinaded for the full 4 hours and the flavors came out even better.)
2) Heat a large skillet over medium heat then coat with cooking spray. Once the pan is hot, add the chicken thighs and cook for 4-5 minutes on each side or until the chicken is cooked through. Sprinkle the chicken with sesame seeds and serve immediately. 
(When I followed Pam's instructions to fry the chicken, I never did get that deep, thick glaze that she achieved in the above picture. So, I baked it to see what I could get. Still not the same glazed look. But I do have to say, I preferred the baked chicken over the fried. Baking held the moisture in the chicken and gave the teriyaki flavors more of a chance to develop.)
Enjoy. (I agree!)
Nutritional Information:
6 servings
Amount per serving:
Calories:        109
Fat:                 3.1g
Carbs:             7.2g
Fiber                 .1g          
Protein:         14.2g 
Weight Watchers Points Plus Value: 3
This really was a very good chicken recipe. We had company the night we enjoyed it and everyone commented on how good it was. So, therefore, with only that one modification of baking instead of frying, I give this recipe 4 glorious pins!
If you just hopped over here from Pinterest, Welcome! Feel free to check out any of the other recipes I have reviewed. And come back for another visit sometime soon. - Lynn


Shop Amazon - Mother's Day Gifts

Thursday, April 19, 2012

Chicken, Shrimp and Chorizo Paella


via
This recipe is from Diana and Lisel over at The Jewels of New YorkSee their recipe or follow the recipe here (with my additions and improvements in red):
Chicken, Shrimp and Chorizo Paella - Serves 6
1 Spanish chorizo sausage, sliced
2 tbsps olive oil
6 chicken thighs
1 medium onion, diced
2 cloves garlic, minced
1 tomato, diced (The authors never state when to add the tomato in. So I added it when the broth and rice went in. This seemed to me to be the correct time.)
1 tbsp flat leaf parsley, chopped
1/4 tsp Spanish paprika
3 1/2 cups low sodium chicken broth (I ended up using 4 cups of broth, because I needed a tad bit more to get the rice completely done.)
1/4 tsp saffron threads, crumbled
1 1/2 cups Arborio or other short grain rice
1 lb large shrimp, peeled and deveined
1/4 cup frozen peas, thawed
1 lemon
salt and pepper to taste
1) Season chicken with salt, pepper and a light dusting of paprika.
2) In a large paella pan (I don't have a Paella pan, but I do have a flat-bottomed wok. So I went with that and it turned out great), heat oil over medium high heat. Saute chorizo until browned and edges curl. Remove and reserve for later use. In the same pan, add chicken and brown skin side down until crispy but not cooked through. Reserve to the side.
3) Over medium heat, saute onions, garlic and parsley until golden and soft (I have found that sauteing onion, garlic and herbs together makes for dark brown, if not burnt garlic and herbs. So, I sauteed the onions by themselves for awhile and then added in the garlic and herbs.) Combine rice and broth (I went with 4 cups) into mixture. (I also added the tomato in at this point.) Bring to a boil. Salt and pepper to taste and add crumbled saffron.
4) Add chicken, chorizo and shrimp and continue to simmer without stirring until the liquid has evaporated and the rice is cooked through, about 15 minutes. Cover with foil to ensure all rice cooks through. (I turned the heat down low for this. Basically you are letting steam finish the rice.) Finish paella by turning up the heat during the last bit of cooking, this gives a nice toasted rice bottom to the dish. (Letting the rice steam for about 10 minutes developed the crusty bottom to the rice.) Let the dish rest for about 5-10 minutes before serving.  Stir in peas and garnish with more parsley and lemon wedges.
Nutritional Information:
6 servings
Amount per serving: 
Calories:           325.5                   
Fat:                     12.9g
Carbs:                 16.9g
Fiber                     1.2g          
Protein:               33.9g 
Weight Watchers Points Plus Value: 8
Thoughts: This was really good. Flavorful, spicy and smelled wonderful while cooking. It reminded me a lot of cooking Gumbo. I served this with a side of broccoli and the dinner was enjoyed by all. This recipe deserved 5 yummy pins!
If you just hopped over here from Pinterest, Welcome! Feel free to check out any of the other recipes I have reviewed. And come back for another visit sometime soon. - Lynn


Shop Amazon - Mother's Day Gifts

Monday, April 16, 2012

Roasted Cabbage Wedges


via
This recipe is from Martha over at marthastewart.comSee her recipe or follow the recipe here (with my additions and improvements in red):
Roasted Cabbage Wedges - Serves about 6
1 tbsp plus 2 more tbsps extra-virgin olive oil
1 medium head green cabbage, cut into 1-inch thick rounds
coarse salt and ground pepper
1 tsp caraway or fennel seeds (I'm not fond of fennel so the first time I made this I used caraway. But then after that, I didn't use any seeds. Just the olive oil, salt and pepper were enough for me.)
1) Preheat oven to 400 degrees. 
2) Brush a rimmed baking sheet with 1 tbsp extra-virgin olive oil. Place 1 medium head green, cut into 1-inch-thick rounds, in a single layer on sheet and brush with 2 tbsps oil.
3) Season with coarse salt and ground pepper and sprinkle with 1 tsp of caraway or fennel seeds.
4) Roast until cabbage is tender and edges are golden, 40 to 45 minutes.
Nutritional Information:
6 servings
Amount per serving: 
Calories:                97.5              
Fat:                         7.2g
Carbs:                     8.2g
Fiber                       3.5g          
Protein:                   2.2g           
Thoughts: This is totally my new favorite roasted vegetable dish. My hubby and I love it. It goes with just about anything. It smells good and is very filling. I wholeheartedly give this recipe 5 happy pins.
If you just hopped over here from Pinterest, Welcome! Feel free to check out any of the other recipes I have reviewed. And come back to visit again sometime soon. - Lynn


  Shop Amazon - Mother's Day Gifts

Friday, April 13, 2012

Man-Pleasing Chicken


via
This recipe is from  Jenna over at Witty in the CitySee her recipe or follow the recipe here (with my additions and improvements in red):
Man-Pleasing Chicken - Serves 6
1/2 cup Dijon mustard
1/4 cup maple syrup
1 tbsp rice wine vinegar
1 1/2 lb package chicken thighs, skin removed (My personal experience says that chicken thighs are the superior cut to use. They are higher in fat and thus suck more flavor into the meat.)
salt and pepper
fresh rosemary
1) Preheat oven to 450 degrees (At first I thought this was a misprint. 450 degrees is pretty high. I was worried that high of a temperature would burn the maple syrup, but it didn't. But I was so worried, I kept opening the oven to check on it. So maybe 450 wasn't really the best temperature for me to cook at. Next time I'm going to go with 350 and not worry so much.)
2) Mix together the Dijon mustard, maple syrup and rice wine vinegar
3) Put chicken in oven-proof baking dish. Pour maple mustard mixture over the chicken, turning the thighs in the mixture so they are fully coated.
4) Put thighs in the oven, and let the bake for 40 minutes or until a meat thermometer reads 165 degrees. Baste the tops of the chicken with more sauce half way through.
5) Let the chicken rest for 5 minutes before serving. Plate the chicken, making sure to spoon some extra sauce over the top. Sprinkle some fresh rosemary on top. (I tried half with rosemary and half with basil, just because I had some in the fridge. Actually, both were great. Probably any fresh herb would be wonderful.)
Nutritional Information:
6 servings
Amount per serving: 
Calories:                308             
Fat:                         3.6g
Carbs:                   10.6g
Fiber                         .7g          
Protein:                 55.3g           
Weight Watchers Points Plus Values: 7
Thoughts: This is, without a doubt, my new favorite way to make chicken. The mustard and maple balance each other out so nicely. If you're worried about a strong mustard taste, don't. The flavors were delightful. Not only was this recipe Man-Pleasing, but the woman was quite pleased as well. I wholeheartedly give this recipe 5 proud pins!
If you just hopped over here from Pinterest, Welcome! Feel free to check out the other recipes I have reviewed. And come back for another visit sometime soon. - Lynn


Shop Amazon - Mother's Day Gifts

Monday, April 9, 2012

Spicy Drunken Shrimp


via
This recipe is from Barbie over at Wishful ChefSee her recipe or follow the recipe here (with my additions and improvements in red):
Spicy Drunken Shrimp - Serves 2
1/2 pound shrimp
1 can of beer
1 shallot, sliced
2 cloves garlic, chopped
1 tsp red pepper flakes, or to taste (I went with 1/8 tsp, because I know how hot red pepper flakes can be)
1-2 bay leaves
fresh chipped parsley
salt and pepper, to taste
1) Add shallot, garlic, red pepper flakes and beer in a large saucepan and turn heat on high. Bring to a boil and reduce beer sauce by half, stirring occasionally.
2) Add shrimp and cook until pink, about 3-4 minutes. Season with salt and pepper, if needed. Serve with crusty bread or on top of rice. (I served it over rice)
Thoughts: This was the blandest shrimp recipe I have ever come across. I thought with the different flavors thrown in there we would have a very tasty dish. No such luck. Will never make this again. This dish gets just 1 pin. Save your shrimp for something much more interesting.
If you just hopped over here from Pinterest, Welcome! Feel free to check out any of the other recipes I have reviewed. And come back for another visit sometime soon. - Lynn


Friday, April 6, 2012

Raspberry Lemon Cheesecake

Post image for No Bake Raspberry-Lemon Cheesecake
This recipe is from Jamie over at My Baking AddictionSee their recipe or follow the recipe here (with my additions and improvements in red):
Raspberry Lemon Cheesecake (No Bake) - Serves 6
Ingredients - Crust
3/4 cup graham cracker crumbs
1 tbsp sugar
3 tbsps unsalted butter, melted
Ingredients - Filling
2/3 cup sugar
Zest of 2 lemons
1 8oz pkg cream cheese, softened
2 tsps fresh lemon juice
1 tsp vanilla extract
1 8oz tub frozen whipped topping, thawed
1 cup fresh raspberries, slightly mashed with a fork (I slightly mashed and actually should have been mashed a bit more. Raspberries that were not mashed enough sunk to the bottom of the dishes while chilling.)
1) In a medium bowl, stir together the graham cracker crumbs and 1 tbsp of sugar and melted butter. Evenly divide the crumbs between your individual serving dishes and press into the bottoms of the dishes to form a crust layer.
2) In a large bowl, mix together the sugar and lemon zest until the sugar becomes moist and fragrant. (This was my favorite part. It smelled so good.) Add cream cheese and beat with an electric mixer until smooth. Add lemon juice and vanilla mixing to combine. Using a rubber spatula, fold in the whipped topping until will blended, then folded in the raspberries.
3) Evenly pipe or spoon the filling into individual serving dishes. Cover with plastic wrap and refrigerate for at least 2 hours before serving. If desired, garnish with fresh raspberries and a sprig of fresh mint.
Nutritional Information:
6 servings
Amount per serving: 
Calories:                351              
Fat:                       17.2g
Carbs:                   44.6g
Fiber                       1.7g          
Protein:                      6g           
Weight Watchers Points Plus Values: 10
Thoughts: I made these little cheesecakes with thawed frozen raspberries because I was very ready for winter to end and spring to begin. That was a perfect idea. They came out very light and fluffy. Nice raspberry taste, followed by the fresh lemon was like heaven. I loved it. Proudly, I give this recipe a bold 5 pins. Enjoy!
If you just hopped over here from Pinterest, Welcome. Feel free to check out any of the other recipes I have reviewed. And come back to visit us again sometime soon. - Lynn

Wednesday, April 4, 2012

Gluten-Free Black Bean Brownies

Black Bean Brownies (Gluten Free). Photo by Marg (CaymanDesigns)
This recipe is from Calouste over at Food.com. See her recipe or follow the recipe here (with my additions and improvements in red):
I've put the recipe below, but, truly, save yourself the trouble and DON'T MAKE THIS! It tastes nothing like chocolate. It tastes like black bean cake. It is grosser then gross. I couldn't wash my mouth out fast enough. Never again.
Gluten-Free Black Bean Brownies
1 (15 1/2 ounce) can black beans (rinsed and drained)
3 eggs
3 Tbsps oil
4 Tbsps cocoa powder
1 pinch salt
1 tsp vanilla
3/4 cup sugar
1) Mix ingredients together in a blender/food processor until pureed.
2) Pour into a greased 8 x 8 cake pan.
3) Stir in some chocolate chips and nuts, or leave plain. (I left mine plain to see what kind of canvas I was working with.)
4) Bake at 350F for approximately 30 minutes.
5) Let cool completely before cutting.
Nutritional Information:
16 Servings
Amount per serving: 
Calories:                102.2              
Fat:                          3.7g
Carbs:                    14.9g
Fiber                        2.1g          
Protein:                    3.2g           
Weight Watchers Points Plus Values: 3
Thoughts: Only make this is you really LOVE black beans in cake form, because that is exactly what it tastes like. Since my lowest rating is 1 pin, I will, indeed, give it 1 pin. If I could go lower, I so totally would.
If you just hopped over here from Pinterest, Welcome! Feel free to check out any of the other recipes I have reviewed. And come back for another visit sometime soon. - Lynn