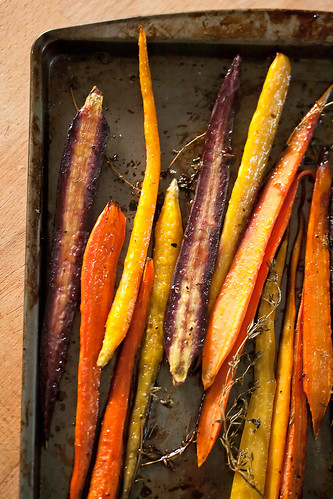
Friday, March 30, 2012

Balsamic Roasted Carrots

Honey-Balsamic Roasted Carrots
via

My carrots.
Hello readers of Me and Pinterest! My name is Kelly, I am Lynn's oldest daughter, fellow writer, and fellow food critic! Thanks, Mom, for letting me guest post on your blog!
This recipe was originally posted by Isabelle at Crumb blog. I mentioned this recipe on my blog, Rainboots and Beef, as part of my 25 before 25 list but didn't provide complete directions. Go to the link above or follow the recipe right here (with my additions and improvements in red):
Balsamic Roasted Carrots
Make sure to use tender young carrots for this recipe - the kind sold in a bunch with their green tops still attached (I definitely didn't use "tender young carrots." My carrots were regular "bagged utility carrots." I would never go out of my way to spend five times more money on carrots that will probably taste the same when cooked. But that could be just because I am a poor graduate student saving money for a summer abroad.)- rather than bagged utility carrots. If you can find them, rainbow - coloured heirloom carrots make a particularly pretty presentation. To make up for not having a "particularly pretty presentation," I added some color by throwing some green bell peppers in the mix.
Ingredients:
2 bunches fresh carrots, peeled and trimmed (I had about 8 carrots and two bell peppers in my fridge.)
1 Tbs olive oil
1 tsp salt
1/2 tsp pepper
5 sprigs fresh thyme (I didn't have any fresh thyme, so I used dried thyme flakes.)
2 Tbs honey
2 Tbs balsamic vinegar (I didn't have any regular balsamic vinegar on hand, but I did have some ultra fancy blackberry balsamic vinegar leftover from my cousin's wedding. The fancy cork top got lodged in the bottle and since I don't have a wine cork opener I had to pry the cork out with fondue skewers. It was not a pretty sight, but I made it work.)
Instructions:
1) Preheat oven to 425F. Line a large baking sheet with aluminum foil.
2) Slice the carrots in half lengthwise. I did this, and also cut each bell pepper in 1/4s. In a large mixing bowl, toss with oil, salt and pepper until evenly coated.
3) Arrange carrots in a single layer on the prepared baking sheet, and scatter thyme sprigs overtop. I just opened the oven and sprinkled thyme flakes right out of the jar. Roast in preheated oven for 15 minutes.
4) In small bowl, whisk together honey and balsamic vinegar. Pour over the carrots, and gently roll them around to coat. Roast for a further 15-20 minutes or until carrots are tender and caramelized. I went a little longer than this, but checked them every few minutes to assess how "tender and caramelized" they were.
Serve immediately. These were amazing straight out of the oven, so I definitely agree with the "serve immediately" instructions. I was eating these alone, and couldn't eat all of them, so I saved some in the fridge for later. Bad idea. These carrot jewels are definitely an eat-right-now experience. So, make a small batch, or don't eat alone. Invite your neighbors over. Call all your friends. Call all your enemies, for that matter. You never know what kind of effect really good carrots will have on people.
Nutritional Information:
8 servings
Amount per serving: 
Calories:                77              
Fat:                       1.9g
Carbs:                 15.1g
Fiber                        3g          
Protein:                    1g           
Weight Watchers Points Plus Values: 2
So in my estimation these carrots earn a stellar 5 pins! Thanks, Mom for letting me post. If anyone wants to follow me on my adventures in France, follow me here. Enjoy!
If you just hopped over here from Pinterest, Welcome! Feel free to check out any of the other recipes I have reviewed. And come back for another visit sometime soon. - Lynn
Who knew there was an entire cookbook on roasted veggies? See the ad below! 

Wednesday, March 28, 2012

Roasted Mustard Potatoes

 
                                                                                  via
This recipe is from Reeni over at Cinnamon Spice & Everything NiceSee her recipe or follow the recipe here (with my additions and improvements in red):
Roasted Mustard Potatoes - 5 servings
Ingredients:
3 tbsps extra-virgin olive oil, plus more for greasing pan
1/2 cup whole grain Dijon mustard
2 tbsps butter, melted (I used unsalted butter)
2 tbsps fresh lemon juice
1 tsp lemon zest, grated
3 garlic cloves, minced
1 tbsp dried oregano
2 tbsps grated Parmesan cheese
1 tsp sea or kosher salt and fresh ground black pepper (I used kosher salt. For a detailed explanation of the differences, see below.*)
5 cups potatoes, cut into 3/4 inch cubes (At this point in the recipe, I think Reeni should have listed a preference for the kind of potatoes that make the best oven fries. For a detailed explanation of the best potatoes for oven fries, see below.**)
1) Preheat oven to 425F. Lightly grease a large, rimmed baking sheet with olive oil.
2) Reeni never mentions soaking the potatoes, but doing so makes for much crunchier fries because it draws out some of the starch. To do this, cover potatoes with water, add 1 Tbsp sugar, soak for 15-30 minutes.
3) Whisk mustard, olive oil, butter, lemon juice, zest garlic, oregano, parmesan, salt and a few turns or pinches of black pepper. Add cubed potatoes and toss well.
4) Spread out on baking sheet and bake 30-35 minutes until crusty and golden brown.
Nutritional Information:
5 1-cup servings
Amount per serving: 
Calories:                255              
Fat:                       14.2g
Carbs:                   28.8g
Fiber                       4.1g          
Protein:                   4.9g           
Weight Watchers Points Plus Values: 7
*Salt Differences: from foodnetwork.com: "For the cook's purposes, the main difference between salts is in their texture. Table salt's fine granules dissolve quickly, making it the preferred salt of bakers. Sea salt and kosher salt possess larger, irregular grains that add a delightful crunch and hint of briny flavor when sprinkles on food at the last minute. Generally, savvy cooks prefer kosher salt when cooking, since its coarse texture is easier to take a pinch of when seasoning savory dishes."
**Potatoes for Oven Fries: The best potatoes to use for oven fries are red or gold Yukon potatoes. Russets have too much moisture and all you'll end up with is a steam bath of mush.
I ended up cooking the potatoes for 40 minutes, hoping for that nice caramel color Reeni achieved. Never happened. They also did not have any kind of crunch, which is one of the many joys of eating fries in the first place. The taste of these, however, was awesome! I loved the mustard-lemon combination. I don't think the butter was necessary, since the healthier choice of olive oil is already in the recipe. Next time I make these, and yes there will be a next time, I will soak the potatoes, leave out the butter, double the oregano and garlic. For these reasons, these great potatoes earn 4 shiny pins.
Enjoy!
If you just hopped over here from Pinterest, Welcome! Feel free to check out any of the other recipes I have reviewed. And come back for another visit sometime soon. - Lynn
Who knew the salt could be grey? See the ad below!

Monday, March 26, 2012

Cinnamon Roll Cake


via
This recipe is from Nikki over at Chef in TrainingSee her recipe or follow the recipe here (with my additions and improvements in red):
Cinnamon Roll Cake - Serves 16
Nikki credits Grin and Bake it for this recipe.
Cake:
3 cups flour
1/4 tsp salt (Next time I am changing this to 1/2 tsp salt.)
1 cup sugar
4 tsps baking powder
1 1/2 cps milk
2 eggs
2 tsps vanilla
1/2 cup (1 stick) butter, melted (Just in case you are not an experienced baker, most baking uses unsalted butter.**)
Topping:
1 cup (2 sticks) butter, softened (See butter comments below.**)
1 cup brown sugar
2 Tbsps flour
1 tbsp cinnamon
Glaze:
2 cups powdered sugar
5 tbsps milk
1 tsp vanilla
(Read through the instructions completely before beginning. In #2, the sentence about adding the melted butter in last is very important. I learned the hard way.)
1) Preheat oven to 350 degrees. Spray a 9 x 13 glass baking pan with cooking spray. Set aside.
2) In an electric or stand mixer add the flour, salt, sugar, baking powder, milk, eggs and vanilla. Once combined well, slowly stir in the melted butter. Pour into the prepared baking pan.
3) For the topping, in a large bowl, mix the 2 sticks of butter, brown sugar, flour and cinnamon together until well combined and creamy. Drop evenly over the batter by the tablespoonfuls and use a knife to marble/swirl through the cake. (Make sure to get the topping swirled all the way to the edges. I thought I accomplished this, but still ended up with a 1/2 inch of just cake with no topping around the edge of the pan.)
4) Bake at 350 for 35-40 minutes or when a toothpick inserted near the center comes out nearly clean. (The words "nearly clean" are important here. The cake develops deep groves into the cake, that make it look just like a cinnamon roll. You don't want to cook for so long that these groves dries out.)
5) For glaze, in a medium bowl, mix the powdered sugar, milk and vanilla together with a whisk. Drizzle evenly over the warm cake. Serve warm or at room temperature.
**Salted or unsalted butter, that is the question. There are many reasons not to use salted butter. A few are: the amount of salted added will vary according to the manufacture, salt in salted butter is used as a preservative and some people believe (myself included) that unsalted butter brings out a true delicate butter flavor in whatever dish you put it in. 
All of that said, I still felt that the cake did not have enough salt to balance the large amount of sugar in this recipe. Next time I will continue to use unsalted butter and increase the salt added to 1/2 tsp.
Serving suggestions: Ice cold milk or large mug of coffee!
Nutritional Information:
16 Servings
Amount per serving: 
Calories:               417     
Fat:                        19g
Carbs:                64.7g
Fiber                       .6g
Protein:                4.1g
Weight Watchers Points Plus Values: 12
Final thoughts: I took this cake to a potluck/meeting and received huge compliments on it. It looked like a cinnamon roll and, more importantly, tasted just like a cinnamon roll. It was just that good. And so for that reason, I give this recipe 5 pins and one OMGosh this is good!
Enjoy! (I agree!)
If you just hopped over here from Pinterest, Welcome! Feel free to check out any of the other recipes I have reviewed. And come back for another visit sometime soon. - Lynn

Wednesday, March 21, 2012

The Best Broccoli of Your Life

IMG_1.JPG
via

This recipe is from Adam over at Amateur GourmetSee his recipe or follow the recipe here (with my additions and improvements in red):
The Best Broccoli of Your Life - Serves 12
(This recipe is Adam's interpretation of Ina Garten's recipe. He does not quote her title for the recipe, but he alludes to the name of the cookbook: Back to the Basics.)
Ingredients:
4 to 5 lbs of Broccoli, cut into relatively big florets, dried throughly
(At this point in the recipe Adam includes a short paragraph about washing and drying anything you plan on eating...dry them THOROUGHLY. That is, if you wash them. I saw an episode of Julia Child cooking with Jacques Pepin once when Pepin revealed he doesn't wash chicken before putting it in a hot oven: "The heat kills all the germs," he said in his French accent. "If bacteria could survive that oven, it deserves to kill me." By that logic, then, I didn't wash my broccoli; I wanted it to get crispy and brown. If you're nervous, though, just wash and dry it obsessively. I, personally, can't recommend the no wash policy. I once lived in the heart of California's Salad Bowl Capitol of the World, Salinas, California. I lived in an old adobe house surrounded by lettuce, broccoli and strawberry fields. If I had a penny for every time I saw a field worker wash his/her hands after using the porta-potties, I would now be a billionaire. I saw field workers wash their hands about the number of times I saw a polar bear on my porch. A billionaire I am not! I washed the broccoli really well, dried it and then let it air dry for about 30 minutes.)
Ingredients continued...
5 Tbsp Olive Oil
1 1/2 tsps Kosher Salt
1/2 tsp fresh ground Pepper,
4 Garlic Cloves, peeled and sliced
1 Lemon
1 1/2 Tbsp Olive Oil
1/3 cp freshly grated Parmesan Cheese
3 tbsp Pine Nuts
2 tbsps julienned fresh basil
Put the broccoli on a cookie sheet. Toss with olive oil, salt, pepper and garlic. (If I were to do this recipe again, I would not add the garlic. The garlic, cooked at that high of a temperature, became very dark brown and had an overcooked quality to the dish. If I were to do this recipe again, I would either saute the garlic and add after the broccoli has cooked or instead of Kosher salt, sprinkle with garlic salt. Roast in the oven 20 to 25 minutes, until crisp-tender and the tips of some of the florets are browned. (20 minutes for my experiment.) I shook the pan around a bit as it went, but not sure that's necessary. (It wasn't.)
When it's done, take it out of the oven-and here's where it gets really good-zest a lemon over the broccoli, squeeze the lemon juice over the broccoli, add 1 1/2 tbsp more olive oil (I would leave this second flood of olive oil out), 3 tbsps toasted pine nuts (I left those out) and 1/3 cup freshly grated Parmesan Cheese. She also has you add 2 tbsps julienned fresh basil, but I left that out too. (I did not leave them out and LOVED the pine nuts, basil and lemon flavors together.) 
He concluded the recipe....You won't miss it (the pine nuts and basil): the magic combo of the crispy broccoli, the garlic, the lemon and the cheese will make this the best broccoli of your life. 
Serving Suggestions: We had this with Creamy Mashed Potatoes and Garlic Lime Chicken. A great time was had by all.
Nutritional Information:
12 Servings
Amount per serving: 
Calories:               150     
Fat:                        10.3g
Carbs:                    11.9g
Fiber                        6.2g
Protein:                    7.5g
Weight Watchers Points Plus Values: 4
Final Thoughts: I tried this recipe because it promised to be "the best broccoli" of my life. It wasn't. But it also wasn't the worst. Even though the garlic overcooked and the amount of olive oil was excessive, I still plan to make this again. I am full of hope and optimism that the next time it really will be the best broccoli of my life. I will keep you posted. I give this recipe 3 pins. 
If you just hopped over here from Pinterest, Welcome! Feel free to check out any of the other recipes I have reviewed. And come back for another visit sometime soon. - Lynn

Monday, March 19, 2012

Creamy Make Ahead Mashed Potatoes

Make Ahead for Easy Entertaining
via
This recipe is from Marjory over at dinner momSee her recipe or follow the recipe here (with my additions and improvements in red):
Creamy Make Ahead Mashed Potatoes
8 cps mashed potatoes (approximately 4lbs)
1/2 cp cream cheese
1 cp sour cream
1 tsp salt
1/3 tsp pepper
1 Tbls fresh parsley or 1 tsp dried
1 tsp onion powder (optional)
6 Tbls butter, sliced into tabs
1) Peel and quarter 4lbs of Yukon gold potatoes.
2) Place potatoes in a large pot and cover with cold water. (Cover the pot with a lid and the potatoes will cook faster.) 
3) Bring water to a boil and cook until potatoes are tender, approximately 30 minutes. (Because I put a lid on the pot, my potatoes took 20 minutes to cook.)  
4) Drain potatoes and return to the pot or a large bowl.
5) Add remaining ingredients to pot with potatoes in small quantities and mix with beaters. Begin at low speed and switch to medium speed as mixture combines. (Original recipe writer should have had you add all the remaining ingredients, EXCEPT the butter. That gets added in the end.)   
6) You're finished with the mixture when it is creamy and smooth.
7) Decision time: eat now or freeze.
8) To eat now, top with the 6 tabs of butter and enjoy.
9) To freeze: Transfer mixture to 9 x 11 baking dish. You can also divide the mixture between smaller baking tins or plastic containers that will go in the freezer.
10) Top with the 6 tabs of butter.
11) Wrap freezer containers with aluminum foil, followed by plastic wrap. (I have never heard of packaging food this way to go into the freezer. I have always wrapped with plastic wrap first and then if it is going to be in there for awhile, I add a layer of foil. I tried searching the internet on which way is truly the best and could not find anything. Any thoughts?)
11) Label and freeze.
When you are ready to use the potatoes, defrost your pan in the refrigerator for approximately 24 hours. Bake, uncovered at 350 degrees for approximately 30 minutes. Stir to mix in the butter. Potatoes should be heated through to a temperature of 145F.
I did not care for these potatoes being warmed up this way. Uncovered these formed a light crust that did not mix in well while stirring in the butter. I preferred warming them in the crock pot, covered. That way the moisture stayed there and no crust developed.
Serving Suggestions: Enjoy with any delicious dinner. I agree. We had steak, these potatoes and broccoli. A delicious dinner was had by all.
Nutritional Information
12 Servings
Amount per serving: 
Calories:               233     
Fat:                         14g
Carbs:                 25.6 g
Fiber                     2.8 g
Protein:                  4.1g
Weight Watchers Points Plus Values: 7 
Tips and Suggestions
This recipe is very versatile. Here are some tips to get the most out of your make ahead mashed potatoes recipe:
  • Freeze potatoes in small containers like large muffin tins or air tight ziplock containers or bags. We recommend using potatoes within 2-3 months of freezing. Longer storage may effect the quality of the dish, but does not pose a safely issue.
  • Picky eaters may not like to see the green specks of parsley, take this ingredient out for a kid-friendly dish.
  • A crock-pot is an excellent way to heat and keep potatoes warm for easy entertaining - and it frees up the oven for another use.
  • Allow about 3/4 cup of mashed potatoes per person. This recipe yields about 9 cups and will feed 12 people. (If you are a family of healthy (meaning big portion) eaters this will feed about 6 people.)
  • Yukon gold or russet potatoes will work best with this recipe because they absorb less water when cooking. (Totally agree. I used Yukon gold and they really were yummy good.)
  • Try these potatoes on top of Shepherd's Pie.
Final Thoughts:
These potatoes really did live up to their name of being creamy potatoes. Proportionally balanced with the right amount of potatoes and creamy ingredients. The next time I make them I am going to add 1 tsp of garlic powder, because in my opinion you can never have too much of a good thing. The prep time for these potatoes from pantry to table was 34 minutes. 
Final grade: 4 pins
If you just hopped over here from Pinterest, Welcome! Feel free to check out any of the other recipes I have reviewed. And come back for another visit sometime soon. - Lynn

Friday, March 16, 2012

Cranberry Ginger Bars

You hear those cranberries calling to you from your freezer?  They want you to make these cranberry ginger bars.  Pronto.
via
This recipe is from Joanne at eats well with othersSee her recipe or follow the recipe here (with my additions and improvements in red):
Cranberry Ginger Bars
Filling:
1 bag fresh or frozen cranberries (2 1/2 cups)
1/3 cups plus 3 tbsp sugar
2 tbsp brown sugar
1 tbsp freshly grated ginger
1 tbsp orange zest
3 tbsp water
1 tsp vanilla extract
Shortbread Crust:
2 cups flour
2 tbsp cornstarch
pinch of salt
1 tsp ground ginger
1 cup butter, softened
1 tsp vanilla
1/3 cup brown sugar
1) Preheat the oven to 350. Grease 8 x 8 baking pan with butter or cooking spray.
2) Place cranberries, sugar, brown sugar, ginger, orange zest, and vanilla in a large pan. Place over medium-high heat and bring to a boil. Boil for five minutes or until reduced and syrup like. Stir once in a while to prevent burning. (At Thanksgiving I make a homemade cranberry sauce. Whole cranberries are easier to eat if they are not whole cranberries anymore. Because of this, while stirring, I smashed the berries down as well.) Take off heat and cool. (I suggest cooling with a lid on the pot. If you don't you will lose precious moisture from the cranberry mix.)
3) Sift together flour, salt, cornstarch, and ginger.
4) Cream the butter with the vanilla and brown sugar. Add in the flour slowly and mix until just incorporated.
5) Press 2/3 of the dough into the prepared pan. (I followed this 2/3 dough instruction and wished I had done 3/4 of the dough, with the remaining 1/4 on top. ) Pour the cranberry filling on top. Crumble the remaining dough over the top. Bake for 30 minutes or until the top begins to brown. Cool on a wire rack. Cut and serve. 
Nutrition Facts
9 Servings
Amount per serving:
Calories        391.3g
Total Fat        20.8g
Total Carbs    53.8g
Fiber                    2g
Protein             3.2g
Weight Watchers Points Plus Values: 11
Thoughts: If I were to do this recipe over again, I would double the cranberry mixture and cut the shortbread mixture in half. As the recipe is, the cranberry mixture is overwhelmed by the large amount of shortbread dough. For this reason, I give this bar cookie 2 pins.
If you just hopped over here from Pinterest, Welcome! Feel free to check out the other recipes I have reviewed. And come back again to visit sometime soon. - Lynn

Thursday, March 15, 2012

The Jelly Bean Prayer

album 3.10.10 019
via
This great kids craft for Easter is from Jenn at Mama Jenn's Blog. Go to her link here to find the how-to's and a free printable version of the Jelly Bean Prayer poem. Love it. Looking forward to having little G-babies of my own someday to make this for them. This winner is definitely five pins. Enjoy!
If you just hopped over here from Pinterest, Welcome! Feel free to check out any of the other recipes I have reviewed. And come back for another visit sometime soon. - Lynn

Wednesday, March 14, 2012

Duchess Potatoes

Easter dinner side
via
This recipe is from Cynthia Nelson at stabroeknews. See her recipe or follow the recipe here (with my additions and improvements in red):
Duchess Potatoes - Serves 6
2 lbs potatoes
Water
Salt to taste
2 T salted butter
3/4 cp grated cheddar cheese
1/2 tsp ground white pepper
1 egg, lightly beaten
1 tsp paprika
1/2 tsp water (I ended up needing 2 full tsps of water)
1 T chopped parsley
Nonstick spray
1. Peel potatoes, add to pot, cover and bring to a boil. When the pot comes to a boil add salt to taste. (I don't know what salt to taste means since we were not actually going to drink the potato water. So, I added 1 tsp and called it good.) Cook until fork tender.
2. Preheat oven to 375 degrees F.
3. Mash potatoes while hot and ensure there are no lumps. (I always mash my potatoes with a hand mixer, fast and easy.) Add butter, white pepper (white pepper makes me cough. A lot. Uncontrollably. For a long time. It is never pretty. So, no white pepper in my dinner. And I didn't miss it.) and cheese to the potatoes while it is still hot. Mix thoroughly and season to taste (salt and pepper).
4. Mix in beaten egg ensuring that it is fully incorporated into the mixture.
5. Lightly spray 6 ramekins with nonstick spray.
6. Snip one bottom-end of the plastic zip bag about 3/4-inch across. (I actually think it's better to fill the bag first and then snip.)
7. Add the potato mixture to the bag and squeeze the top in order to force the mixture through the hole in the bag. (If you don't know how to do this there are many examples on Youtube.)
8. Pipe the potatoes into the ramekins going in a circular motion until the ramekin is filled about 1 inch above the rim. Repeat until all the bowl are filled. Transfer the bowls onto a baking sheet/tray.
9. In a small bowl, add the paprika and 1/2 tsp water and make into a paste. (I need to add 2 tsps of water to make this a workable paste) Using a pastry brush, lightly brush the edges of the potatoes. (My Duchess Potatoes looked nothing like the picture above. That picture is highly stylized. They probably used a Q-Tip to make the swirl of paprika look that good. Mine looked like a chicken had walked all over the top. No, I am not sharing the picture. Too embarrassing.)
10. Sprinkle the top with chopped parsley.
11. Bake in preheated oven for 30 minutes or until edges are lightly brown. 
Serving Suggestions: My gang ate these potatoes with Lemon Chicken and broccoli.
Nutritional Information:
6 Servings
Amount per serving: 
Calories:                    218
Fat:                             9.5g
Carbs:                       26.4g
Fiber                           3.3g
Protein:                       7.6g
Weight Watchers Points Plus Value: 6 points
Thoughts:
The prep time for this recipe was 34 minutes. It does require many extra steps beyond making plain mashed potatoes, but the presentation really was lovely. Even though mine looked like chicken scratch, I think I was the only one at the table who noticed that fact. Also these potatoes were good the day they were served. Warmed up the next day, not so much. Therefore, I give this recipe four pins.
If you just hopped over here from Pinterest, Welcome! Feel free to check out any of the other recipes I have reviewed. And come back for another visit sometime soon. - Lynn

Sunday, March 11, 2012

Lemon Chicken

chicken
via
This recipe is from Anita at feeding my picky eaters. See her recipe or follow the recipe here (with my additions and improvements in red):
Lemon Chicken - Ina Garten Recipe
1/4 cp olive oil
3 Tbs minced garlic (9 cloves)
1/3 cp dry white wine
1 Tbs grated lemon zest (2 lemons) (I got 1 Tbs with 1 lemon)
2 Tbs freshly squeezed lemon juice (I used the entire lemon used to make the zest)
1 1/2 tsp dried oregano
1 tsp minced fresh thyme leaves
Kosher salt and freshly ground black pepper
4 boneless chicken breasts (6 to 8 ounces each)
1 lemon
1. Preheat the oven to 400 degrees.
2. Warm the olive oil in a small saucepan over medium-low heat, add the garlic, and cook for just 1 minute but don't allow the garlic to turn brown. Turn off the heat, add the white wine, lemon zest, lemon juice, oregano, thyme, and 1 tsp salt and pour into a 9x12-inch baking dish.
3. Pat the chicken breasts dry and place them skin side up over the sauce. Brush the chicken breasts with olive oil (this step is important, skipping this step will lead to very parched chicken) and sprinkle liberally with salt and pepper. Cut the lemon into 8 wedges and tuck it among the pieces of chicken.
4. Bake for 30-40 minutes, depending on the size of the chicken breasts, until the chicken is done and the skin is lightly browned. (For my attempt, cooking time took 33 minutes.) If the chicken isn't browned enough, put it under the broiler for 2 minutes (My chicken was not browned at all. So I cooked under the broiler on high for 2 minutes and watched it like a hawk the entire time.) Cover the pan tightly with aluminum foil and allow to rest for 10 minutes. Sprinkle with salt and serve hot with the pan juices.
Nutrition Facts:
4 Servings
Amount per serving:
Calories        265.1g
Fat                    2.9g
Carbs                1.3g
Fiber                   .1g
Protein            54.6g
Weight Watchers Points Plus Values: 6
Serving Suggestions: My gang ate this chicken with Duchess Potatoes and broccoli. 
Final Thoughts: This chicken recipe really did live up to its name of being a nice lemony chicken. The lemon taste had great depth through every bite, not just on the skin and outer edges.  The herbs mixed with the lemon made the entire kitchen smell wonderful. And I loved running out to my herb garden to grab a handful of fresh thyme. The next time I make this recipe I am going to also go with fresh oregano along with the fresh thyme. Other than that, I, and all I dined with, loved it. My Prep Time was 16 minutes, from pantry to oven. Based on my grading system, I give this recipe 5 well-deserved Pins.
If you just hopped over here from Pinterest, Welcome! Feel free to check out any of the other recipes I have reviewed. And come back for another visit sometime soon. - Lynn